Tuesday, January 29, 2013

A Few of My Favorite Pins...

I have really been into Pinterest lately. I used it when it first came out but then took a long hiatus from it, I'm not really sure why. Recently I started new boards and I have really been enjoying having a place to store all of the things that have been inspiring me.

Here are a few of my favorite finds:

http://brookandlyn.com/artobjects/


http://www.etsy.com/shop/michellemoode


http://all-roads.tumblr.com


http://www.susannabauer.com/page5.htm


http://craftcouncil.org/magazine/article/lenore-tawney-spiritual-revolutionary


http://knithacker.com/2011/03/14/patricia-bowns-sea-urchins/

Add me on Pinterest, Facebook and/or Instagram-would love to see what inspires you!


Sunday, January 27, 2013

Kelsey Viola Wiskirchen

Hope you all had a great weekend! I have been busy this week with some freelance work and trying to survive this chilly NYC weather. I saw this video on Joetta Maue's blog and found Kelsey Viola Wiskirchen's work so amazing and inspiring:


I have dreamed of working with a women's weaving collective in another culture and hearing about Kelsey's experience with weaving and natural dying in South Africa and Bolivia has inspired me to think about that venture again. I did a lot of weaving in college and loved it but haven't done much since, even though it is something that I haven't stopped thinking about and have vowed to myself to get back into.  It has particularly been on my mind even more so lately and the other day when  I saw this video it really seemed to be a sign. Funny how that works. I am sure once I begin it will be like reuniting with a long lost friend - never have missed a beat. I will keep you posted on that.
I think Kelsey's work is absolutely beautiful and her use of text and photographic imagery to tell the stories of women is something remarkable that really resonates with me.

For more information on Kelsey and her work:

http://www.kelseyviola.com

Enjoy!


Thursday, January 17, 2013

Elisa D'Arrigo

Last night I went to the January meeting for the Textile Study Group of New York. Every month they host a guest speaker and tonight was artist Elisa D'Arrigo. Her work was so organic and beautiful and hearing her speak about her creative process regarding the work she has been creating for the past 25 years was incredibly inspiring. I loved her intuitive and playful approach to her work. Born and still residing in New York City, D'Arrigo has primarily worked with cloth, thread, handmade paper, wax, wire, paint and ceramics. My favorite pieces were these sewn works.

Cross Section (4)
2004
socks, thread, acrylic paint,marble dust
40 x 25 x 3 inches
White Shadows (2)
2009
paper, cloth, thread, acrylic paint
9 x 7 x 1 inches

Budding (6)
2001
cloth, thread, acrylic paint
33 x 47 x 49 inches

Budding (6) DETAIL
2001
cloth, thread, acrylic paint
33 x 47 x 49 inches


Inside Out (12)
2000-2002
cloth, thread, acrylic paint
109 x 53 x 72 inches
Collection Mead Art Museum,
Amherst, MA
Inside Out (12) DETAIL
2000-2002
cloth, thread, acrylic paint
Collection Mead Art Museum
Amherst, MA

Inside Out (11)
2000-2002
cloth, thread, acrylic paint
88 x 69 x 30 inches
Inside Out (11) DETAIL
2000-2002
Cloth, Acrylic Medium, Thread
88 x 69 x 30 inches


Recollection...terracotta (1)
2008
cloth, acrylic paint, thread
20 x 19 x 4 inches
Reconstructed (5)
2009
handmade paper, thread, acrylic paint,
marble dust
18 x 8 x 8 inches
Most of the large pieces take almost a year or more to complete. Using fabric and acrylic medium she sculpts the wet fabric over an object and removes the object once the fabric is dry. All of the fabric forms are then sewn together by hand and stitched using the thread as a mark making tool to create three dimensional cross hatching and lines. From her statement:

"In many recent sewn works, a specific memory underlies each piece, and partially determines its particular character and color. These are memories of things that I have observed and then held in my mind's eye, sometimes for decades: they are the subtext of the work.  Attempting to conjure a mental image into a physical object is an elusive process due to the fugitive, constantly shifting nature of memory. 

Memories are only points of departure. It is the physical process of making the work that takes over, and has a life of its own. A work in progress could evolve for months, (even years); expanding, contracting, even recombining with cast off parts of itself. My objective is to stay in the moment, mindful of accident and chance,responding to what unfolds. The actual working with materials, and how that results in particulars of form and configuration, is what ultimately determines each piece."

I also really loved her drawings. In particular, the Chiaroscuro series I found breathtaking. Each large drawing is composed of tiny drawing on separate pieces of thin paper that are then pieced together.
                  Chiaroscuro (9)
                              1997
        ink on collaged japanese paper
                      46 x 40 inches

Chiaroscuro (13)
1997
ink on collaged japanese paper
45 x 56 inches

Chiaroscuro (26)
1998
ink on collaged japanese paper

Chiaroscuro (10)
1997
ink on collaged japanese paper
34 x 18 inches

Chiaroscuro (21)
1997
ink on collaged japanese paper
25 x 22 inches

Chiaroscuro (5)
1996
ink on collaged japanese paper
54 x 44 inches


Her 18th show at the Elizabeth Harris Gallery in New York City this November exhibited her return to ceramics after a 30 year hiatus.

"With this work, the vase is my muse.  
These vases bring to fruition a project I've had in mind since childhood:  to freely create a variety of vases conjured up at the moment rather than premeditated, with their configurations dictating what may be placed inside them--function both following and trying to catch up with form.
I have always been energized by the conflation and dissolving of categories: sculpture, drawing, painting. And in this case, adding to the mix: functionality. I seek the and, not the or. "


                       "2 + one"
                                2012
                        glazed ceramic
                     9 x 14 x 9 inches

right: "Quixote", left:
"Lip to Line"
both works 2011
glazed ceramic
Quixote: 5 1/2 x 7 x 7 inches, Lip to
Line: 6 1/2 x 8 x 6 inches

"Molten"
2011
glazed ceramic
5 1/2 x 12 x 8 inches

                                                                                                                                (All photographs: www.elisadarrigo.com)

I love how all of her work, while utilizing different mediums and techniques, all have an underlying feel of textile quality to them. Even the drawings that are pieced together are reminiscent of the act of sewing/quilting.
I look forward to following her work and having the opportunity to see her pieces in person.


For more information and images visit www.elisadarrigo.com


Monday, January 7, 2013

Almond Raspberry Layer Cake

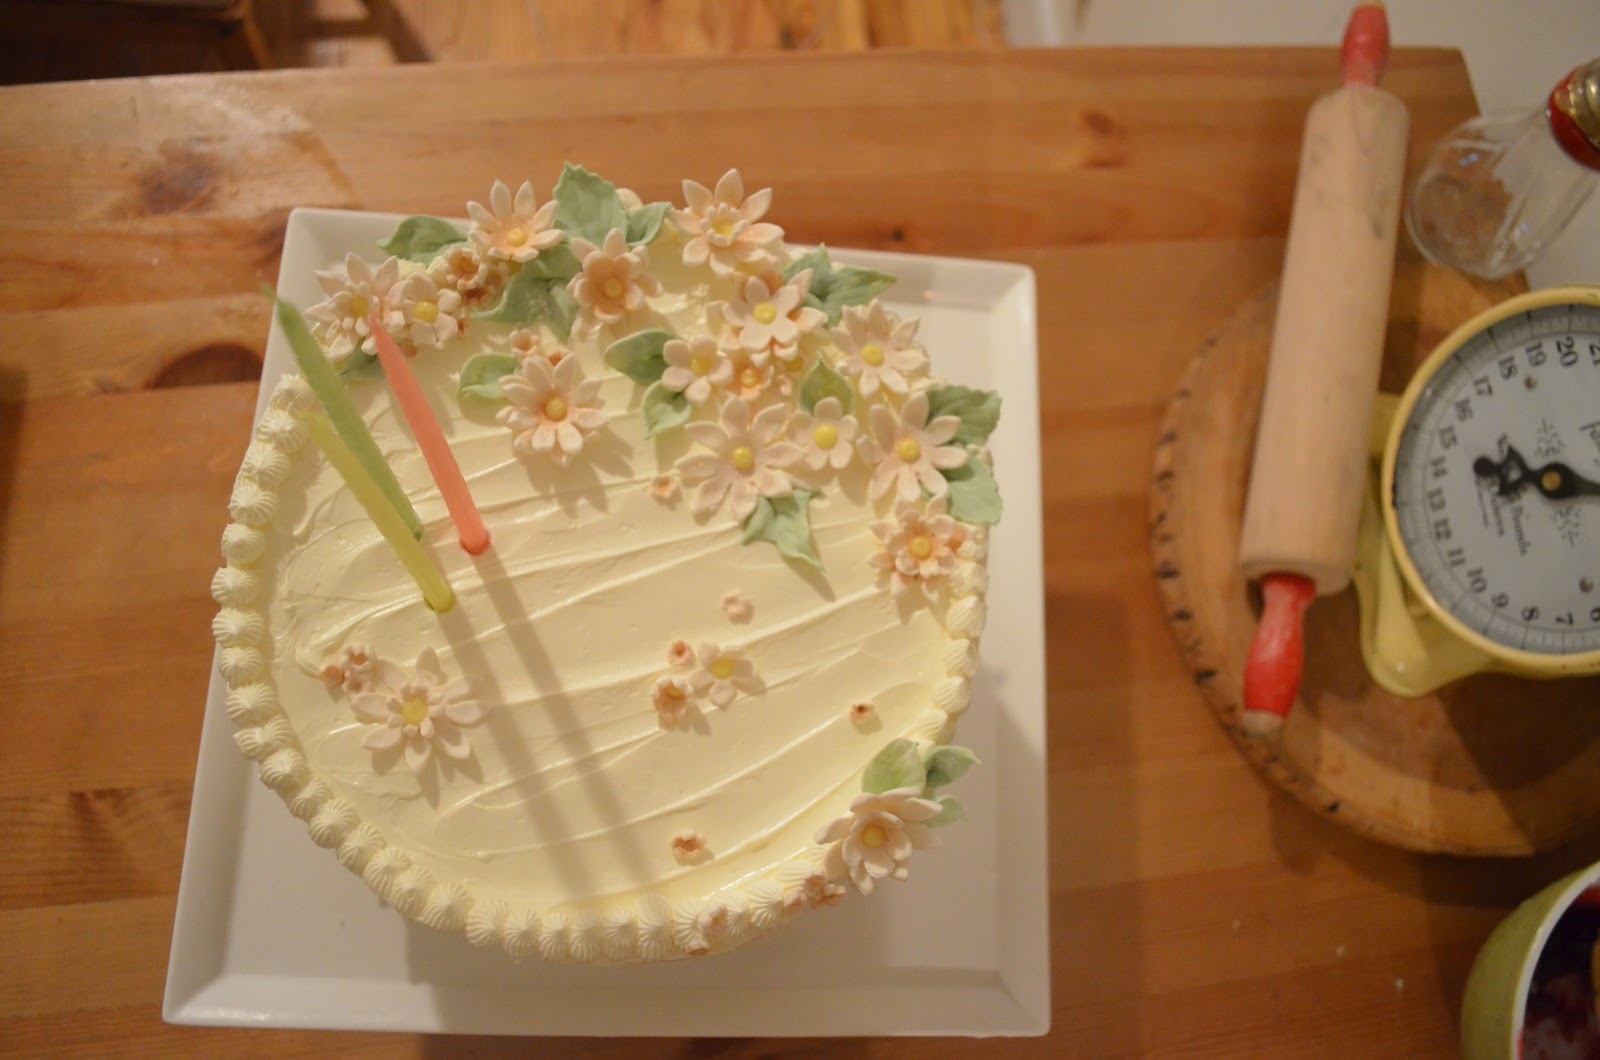
Happy Monday everyone! I hope you all had a fabulous weekend. We enjoyed a lovely two days of hanging out with friends and breaking New Years resolutions (oops!) I was asked to make a cake for a friends birthday party on Saturday evening.I knew there was a surprise proposal happening that night (she said yes!) so I wanted to add a touch of extra special-ness, with a wedding inspired feel to it.  


The recipe I used is from my favorite blog for cooking and baking, Smitten Kitchen. The cake was an almond raspberry cake with an almond swiss meringue buttercream. I ended up making the almond paste myself instead of using the prepared paste, which was actually really easy to make and tasted great. The recipe I used for the paste didn't call for adding extract so I will need to experiment next time to see which I like better. I thought the cake had a good almond flavor, not too overwhelming. For the buttercream I used an organic almond extract to flavor it and made an assortment of fondant flowers dusted with luster dust to adorn the cake. I torted each of the three cake layers and filled with buttercream and then every other layer a combination of buttercream and raspberry jam. 


Almond Raspberry Layer Cake
Adapted from Sky High. 
Makes a 9-inch triple layer cake that serves 16 to 20 people

4 1/2 cups cake flour
4 1/2 teaspoons baking powder
3/4 teaspoon salt
2/3 cup prepared almond paste (7 ounces) *see below on how I made the paste
2 2/3 cups sugar
2 1/2 sticks (10 ounces) unsalted butter, at room temperature
1 tablespoon almond extract
10 egg whites
1 1/2 cups whole milk

For assembly:
1 cup simple syrup (to keep cake moist)(optional) *I did this, I would recommend

1 cup seedless raspberry preserves *I couldn't find a seedless jam at my neighborhood market so I used Stonewall Kitchen's Raspberry Jam and heated it on the stove and then strained it through a sieve to remove the seeds and let it cool before filling cake 

1. Preheat oven to 350°F. Butter the bottoms and sides of three 8-inch (but 9-inch will work just fine) round cake pans. Line the bottom of each pan with a round of parchment or waxed paper and butter the paper.
2. In a medium bowl, sift together the cake flour, baking powder and salt. Set the dry ingredients aside.
3. Place the almond paste and sugar in the bowl of a heavy-duty mixer fitted with the paddle attachment, or in another large bowl if using a handheld mixer. Begin to cream the mixture on low speed to break up the almond paste, then increase the speed to medium for about 2 minutes, or until the paste is broken into fine particles.
4. Add the butter and almond extract and beat it well, then the egg whites, two or three at a time, beating just long enough to incorperate after each addition. Scrape down the sides of the bowl several times to make sure it is evenly mixed.
5. Dust about a third of the dry ingredients over the batter and fold in with a large rubber spatula until just combined. Fold in about half the milk. Fold in half the remaining flour mixture, followed by the remaining milk. Finally, fold in the last of the dry ingredients just until no streaks of white remain. Use a light hand and do not over mix. Divide the batter among the three prepared cake pans.
6. Bake for 25 to 30 minutes or until a cake tester or wooden toothpick stuck into the center comes out clean. Let the cakes cool in their pans on wire racks for about 10 minutes. Turn the cakes out on to wire racks, carefully peel off the paper liners and let them cool completely, about one hour.


*Almond Paste:

8 oz blanched almonds
8 oz confectioner sugar
1 egg white

Of course you can buy almonds already blanched but I had a big bag of raw almonds at home so I simply put them in a bowl and poured boiling water over them to blanch them. Let them sit for no longer than one minute and then drain and rinse with cold water. Pat dry and you will be able to remove the skins. It is strangely satisfying.

Once you have the skins removed then put the almonds into a food processor and grind. Add the sugar and grind again. Once it is a powder I put it into the kitchen aid and then gradually added the egg white. I used a dough hook but found that since it was a small amount it was better to knead it until firm and smooth.

This worked well in the cake but since it was my first time making the paste if anyone out there has a recipe or method they use, feel free to share!


Swiss Meringue Buttercream

Epicurious  | August 2004
Toba Garrett


  • 12 oz (336 g) egg whites (10 large egg whites or about 1 1/2 cups)
  • 3 cups (680 g) granulated sugar
  • 3 lbs (1.36 kg) unsalted butter, room temperature
  • 2 Tbsp almond extract (or flavor of your choosing)


  • 1. Lightly whisk egg whites and sugar together over simmering water until egg-white mixture is hot to touch or a candy thermometer reads 140°F (60°C).
    2. Pour hot whites into a room-temperature bowl and whip with a wire whip until double in volume on MEDIUM-HIGH speed. When the mixer stops, the meringue should not move around in the bowl. Meanwhile cut up butter into 2-inch pieces. (The butter should be slightly moist on the outside but cold inside.)
    3. On your mixer, remove the whip and attach the paddle. Add half the butter (1 1/2 lbs or 680 g) into the bowl immediately and pulsate the mixer several times until the meringue has covered the butter completely. To pulsate the mixer, turn it on and off in a jerky motion. This forces the butter on the top to the bottom of the bowl. Add the balance of the butter (1 1/2 lbs or 680 g) and pulsate mixer several times. Slowly increase the mixer's speed, starting with the lowest speed and increase the speed every 10 seconds until you reach a MEDIUM-HIGH speed.
    4. Continue beating until the mixture begins to look light and fluffy. Stop the mixer and scrape the bowl. Reduce speed to LOW. Add flavoring and continue to beat on LOW speed for 45 seconds. Then beat on MEDIUM-HIGH speed for an additional 45 to 60 seconds.
    5. Leftover buttercream can be placed in plastic containers with lids and kept in the freezer for up to 3 months. Defrost completely (several hours) and rewhip before using.


    Happy Birthday Amy and congratulations Amy and Erica!!!